pure tone audiometry woman testing in a booth

What Is Pure Tone Audiometry?

05/29/24

Pure Tone Audiometry is a behavioral hearing test that evaluates a person's ability to hear different frequencies using pure tones. This test can identify the type and severity of hearing loss.

During the test, the patient wears supra-aural or insert earphones and listens to a series of tones at different pitches and volumes. The clinician will ask the patient to indicate when they hear each tone, usually by pressing a button or raising their hand.

pure tone audiometry headphone types

Pure tones are signals that consist of only one frequency of vibration. Tools like tuning forks and hearing test machines called audiometers produce pure tones.

These tones are essential for hearing assessments conducted by audiologists. Additionally, other professionals, such as hearing aid dispensers, speech-language pathologists, and school nurses, use pure tones in hearing screenings.

girl-getting-screened-in-booth

Clinician testing hearing using an audiometer

Why are pure tones important for understanding speech, even though we typically hear sounds composed of many different frequencies? The answer lies in understanding hearing loss.

Hearing loss usually does not impact all frequencies equally. The most common type, presbycusis, or age-related hearing loss, often affects high frequencies more than low frequencies.

Identifying the different frequencies in a complex sound, such as speech or music, can be challenging. These can make it difficult to distinguish one frequency from another.
Pure tones, consisting of just one frequency, pinpoint exactly where the hearing difficulties lie. Therefore, pure tones are essential for accurately diagnosing and understanding hearing loss.

Pure tones also have a direct relationship with speech sounds. Each phoneme, or speech sound, corresponds to a specific frequency range. Vowels are lower in frequency, while consonants are higher in frequency.

the-speech-banana

The Speech Banana is a visual representation on an audiogram that outlines the area where the phonemes of human speech typically fall in terms of frequency (pitch) and intensity (loudness).

1.Medical History & Needs Assessment: The clinician takes a detailed history to understand the patient's hearing concerns, medical conditions, and relevant background. They may ask why the patient is visiting today or if they have noticed any hearing difficulties.

The clinician may ask questions to determine how well patients hear the TV and understand phone conversations. Since some patients might not realize they have hearing difficulties, asking probing questions is an important part of the assessment.

The clinician may also inquire about the patient's daily activities to better understand their hearing needs. Questions such as "Are you often in group situations?" and "What does a typical day or week look like for you?" provide valuable insights. The clinician uses this information, along with degree of hearing loss, to recommend the most suitable hearing technology if they detect hearing loss.

2.Otoscopy: The clinician uses an otoscope to examine the ears. During otoscopy, the clinician checks the outer ear and tympanic membrane (eardrum) for any abnormalities. They also check to make sure the ear canal is free of wax (cerumen).

woman-getting-ear-checked-with-otoscope

3. Instructions: The clinician explains to the patient how to perform the test. This may include tasks such as pressing a button or raising a hand when they hear a sound.

An example of simple instructions is: "You will hear a series of beeps or tones. Whenever you hear a beep, please press the button, even if it's very quiet. I will start with your right ear and then move to your left ear."

During the case history, if the patient mentions that one ear is better than the other, the clinician will test the better ear first.

4. Test setup: The patient sits in a quiet room designed for hearing tests to make sure the results are accurate. The room is referred to as a sound booth or an audiometric booth. The patient sits, typically facing a window through which the clinician will later operate the audiometer. Once the patient is comfortable, the clinician places the headphones or insert earphones on them and gives them a response button.

The clinician then goes to the other side or outside the sound booth and sets up the audiometer to start the hearing test

For efficiency, it is best to boot up the audiometer at the start of the day. This will help save time and ensure that it is working properly before patients arrive. Once you turn on the audiometer, the best practice is to perform a listening check.

5. Start Testing: The test starts at 1000 Hz, a mid-range frequency easy for most individuals to detect. According to ASHA, during pure tone audiometry, tones should be played for 1-2 seconds. There should be varying intervals between the tones, but they should not be shorter than the test tone.

The starting pure tone volume should be easy to hear, ASHA's suggests a starting presentation level of 30 dB HL (Hearing Level). If the patient does not respond, increase the volume to 50 dB HL. If there is still no response, increase the tone in 10 dB HL increments until the patient responds.

6. Threshold Search: Pure tone audiometry aims to determine hearing threshold levels. A hearing threshold is the lowest level of sound that a person can hear at a specific frequency. It represents the softest intensity at which a sound is detected at least 50% of the time.

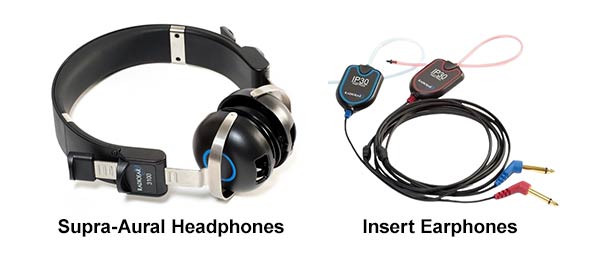
Air conduction testing involves sending sounds through supra-aural or insert earphones into the ear canal to reach the inner ear.

When the patient hears the first tone, the clinician makes it quieter by 10 dB HL. If the patient still hears it, the tone gets quieter by another 10 dB HL. This process continues until the patient no longer responds.

Once the patient no longer responds, the clinician increases the pure tone by 5 dB HL. This back-and-forth process continues until the clinician finds the patient's threshold, which is the softest sound they can hear at least half the time. According to ASHA, the clinician needs at least two out of three responses at a certain level to determine the hearing threshold.

Following ASHA guidelines, diagnostic pure tone testing should cover frequencies of 250, 500, 1000, 2000, 3000, 4000, 6000, and 8000 Hz. These frequencies are crucial for understanding speech.

7. Air Conduction Test Results: The clinician records hearing thresholds on a graph called an audiogram. The vertical axis shows decibels for hearing level, and the horizontal axis shows hertz for frequency.

Air conduction thresholds are recorded on the audiogram as circles for the right ear and x's for the left ear.

audiogram-example

8.Bone Conduction Testing (if needed): If air conduction thresholds are below normal levels, bone conduction (BC) testing must be completed to determine the type of hearing loss. A bone vibrator, or a bone conduction transducer, is placed behind the ear on the mastoid bone to test BC thresholds.

Bone conduction testing is critical in diagnosing the type of hearing loss, whether it be conductive, sensorineural, or mixed. Conductive hearing loss happens when sound waves are blocked or unable to pass efficiently through the ear canal and middle ear. Conductive loss is sometimes treatable with medical or surgical interventions.

Sensorineural hearing loss is a hearing impairment caused by damage or wear and tear to the inner ear (hair cells in the cochlea) or auditory nerve. It typically results in difficulty hearing soft sounds, understanding speech, and experiencing distorted or muffled sound quality.

Sensorineural hearing loss is permanent and cannot be corrected with surgery unless the patient qualifies for a cochlear implant.

Pure tones are presented through the bone vibrator, and the patient's thresholds are determined similarly to air conduction testing. ASHA recommends that bone conduction thresholds be obtained at InterOctave intervals from 250 to 4000 Hz and 3000 Hz.

9. Bone Conduction Threshold Recorded: The bone thresholds are also recorded on the audiogram, next to the air conduction thresholds. Unmasked bone thresholds are denoted as triangular brackets. If bone thresholds are 10 dB HL better than the air conduction thresholds, referred to as an air-bone gap, masking must be performed.

unmasked-bone-conduction-thresholds

Unmasked bone conduction symbols


10. Masking (if needed): Masking ensures that each ear is tested independently. A masker is any noise presented to one ear while the opposite ear is being tested.

During pure tone audiometry, a masker is usually a narrow band of noise centered around the test frequency. The audiometer produces this noise.

During air conduction testing, masking becomes necessary if the asymmetry between the ears exceeds the interaural attenuation. Interaural attenuation refers to the signal's energy reduction as it travels from one side of the skull to the other.

If the opposite cochlea is sensitive enough to detect the signal that has crossed over, it can interfere with accurate audiological testing results. The general recommendation for minimum interaural attenuation during air conduction testing using supra-aural headphones is 40 dB HL.

However, when insert earphones are used the interaural attenuation is higher, ranging from 75 dB HL at lower frequencies to 50 dB HL at higher frequencies. A conservative interaural attenuation value of 50 dB HL for testing with insert earphones is typically used to ensure accurate assessment.

audiogram-symbol-key

When to mask during air conduction testing can also be decided using a simple formula:

ACT(TE)-IA > BCT (NTE)

where

IA (AC) = 40 dB for super-aural earphones

IA (AC) = 50 dB for insert earphones

Explanation: If the air conduction threshold (AC) of the test ear minus the minimum interaural attenuation (40 dB HL/ 50 dB HL) is greater than or equal to the bone conduction threshold (BCT) of the non-test ear, then masking is needed to eliminate the participation of the non-test ear.

During bone conduction testing, interaural attenuation is 0 dB HL, meaning both cochleae are stimulated simultaneously. As a result, masking is often required to obtain accurate results.

In bone conduction testing, the better cochlea typically responds, which can create an air-bone gap between the bone conduction and air conduction thresholds. This gap can inaccurately represent the hearing ability of the worst ear, necessitating the use of masking to ensure precise measurements. If this air-bone gap exceeds 10 dB HL, masking must be used.

When to mask during bone conduction testing can also be decided using a simple formula:

ABG > 10 dB in the TE

Explanation: When an air-bone gap is greater than 10 dB in the test ear (TE), masking should be used in the non-test ear during bone conduction testing.

Introducing a masker to the non-test or better ear keeps its cochlea occupied, allowing the worse ear's cochlea to be tested independently.

Start by determining the hearing threshold in the test ear without masking noise to remind the subject what to listen for.

Introduce masking noise to the non-test ear at its tonal threshold level for that frequency. Allow a few seconds for the subject to adjust and reinstruct if needed.

Re-establish the hearing threshold in the test ear with the masking noise. This new threshold is the pure-tone threshold at that masking level.

Increase the masking noise by 10 dB and re-establish the hearing threshold in the test ear. Repeat until at least three successive measurements yield the same threshold.

When three successive measurements yield the same threshold, you have reached the 'plateau.' This threshold is considered the correct hearing threshold of the test ear. Stop the masking noise and record the threshold on the audiogram.

11. Hearing Test Results & Diagnosis: The clinician examines the test outcomes to determine the type and severity of hearing impairment. If masking reveals an air-bone gap, it indicates conductive hearing loss.

Sensorineural hearing loss is diagnosed if there are no air-bone gaps or if it is no greater than 10 dB HL. If there are air-bone gaps present at some thresholds but not all, a diagnosis of mixed hearing loss is assigned.

hearing threshold chart

12. Post-Test Discussion: The clinician explains the results to the patient, discussing any hearing loss detected and its implications. Based on the findings, the clinician may recommend further tests, hearing aids, or other interventions.

13. Documentation: The patient's medical history, audiogram results, tympanometry results, and recommendations are compiled into a comprehensive report. This report is stored in the patient's file for future reference and follow-up, ensuring continuity of care and informed decision-making.

Understanding how to conduct pure tone testing is crucial for hearing care professionals. However, even the most skilled clinician cannot achieve accurate results without the right equipment and regular calibration.

If you need help choosing the right audiometer for your clinic, our expert team is here to assist you.


Contact Local Office

Schedule your service appointment today

Schedule Service


Source: DeBonis, D. A., & Donohue, C. L. (2004). Survey of Audiology: Fundamentals for audiologists and health professionals (2nd ed.). Pearson Education.

Other Good Reads: Understanding Tympanometry: A Comprehensive Guide


Follow us on Social!

fb_blue_30x30    linkedin_blue_30x30    youtube-logo


If you haven't already, make sure to subscribe to our newsletter to keep up-to-date with our latest resources and product information.